Great Ideas from Convention!

 While at convention I saw so many wonderful things many of which we will be learning this year in my stampten groups. One Class I took gave me a list of all the wonderful uses for Stampin’ Write markers. I wanted to share this with you as I never knew there were so many different uses. I now want the whole set! If any one wants to form a group we could all get the markers over several months Email me if you are interested vkillmore@tully.k12.ny.us
 below is a hand out from one of my clases feel free to print it out and puting it with your stamping stuff.
Many Marvelous Marker Techniques
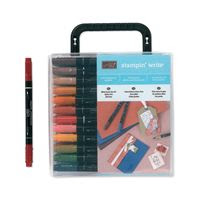
The Many Marvelous Markers set is a great investment. Along with the 48 dual-tip Stampin’ Write markers, it includes a horizontal storage case to keep both tips inked evenly. The markers are fun and can be used with so many techniques.
COLORING. Use either tip to color a stamped image. Watercolor paper works great for this
technique because it will absorb the color and leave fewer stroke marks. You can also use a
blender pen to soften and blend the color.
OPAQUE COLORING. Use Whisper White Craft ink to stamp a bold image on dark card
stock. After the image is dry, use either tip to color over the white. This is a great way to get
vibrant color on a dark background.
COLOR TINT BLACK-AND-WHITE PHOTOS. Spray a photo with a finish spray and use
either tip to color on photos. Lighter-colored inks look better than darker-colored inks.
WATER COLORING. Use the brush tip to place color on a plastic Stamp & Supply box. Dip into
the palette of color using a watercolor brush, blender pen, or Aqua Painter and color a stamped
image. You can also color with a blender pen by pulling color directly from the brush tip.
SHADING WITH INK REFILLS. Use the Color Coach to choose a Dynamic Duo color
combination. Use an ink refill for the darker color and the marker for the lighter color. Squeeze a couple of drops of ink onto a Stamp & Supply box. Place the brush tip in the ink drops until the
tip is saturated with the darker color. When you color with the side of the marker, you get duo
colors. When you’re done, scribble on scratch paper until the darker color runs out.
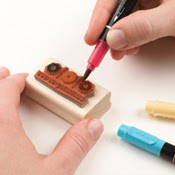
OMITTING. Use the brush tip to color directly onto a stamp to selectively color or omit part of
the image. If you don’t have an ink pad in a color you need, you can use a marker instead. Make
sure to breathe heavily on the stamp to moisten the ink before stamping.
EMBOSSING. It’s simple to emboss a multicolor or omitted image. Ink stamp in VersaMark®
ink. While the stamp is still sticky, color directly onto the stamp with the brush tip. Stamp the
image and emboss with Clear Stampin’ Emboss powder.
SHADING AND HIGHLIGHTING. Choose several markers in different shades of the same
color. Starting with the lightest shade, color directly onto a bold image stamp. Using the next
shade, color around the edges of the image leaving the middle inked with only the lightest
shade. Repeat until just the outside edges are inked with the darkest shade. Stamp image for a
dimensional, shaded look.
WATER MISTING. Use the brush tip to color directly onto the stamp. Mist the rubber with
water and stamp your image (an old Stampin’ Mist® bottle is perfect for this). When you stamp your image it will have a soft look, almost as if it’s been rained on.
COLOR SPRITZER TOOL. You can use the markers with the Color Spritzer tool to create
texture on your stamped projects. You can spritz color onto paper, or for a different look, spritz
directly onto rubber before stamping.
THUMPING. Ink a stamp in a light color ink, and then use the brush tip of darker-colored
markers to randomly “thump” marks of color onto the stamp. This creates an interesting texture and design on your image.
GLOSSY PAPER BACKGROUNDS. Using the brush tips of two or three markers, color a
random design on an old page protector or cello bag (swirled designs work well). Spritz the
design with water until the colors run together. Press glossy card stock face down onto the color, and then lift it out and dry.
DYEING RIBBON. Use either tip to color on ribbon. You can create any pattern in any color
you want. Heat-set the color with a heat tool to prevent smearing
DYEING FLOWERS. For a quick, clean way to dye Pretties Kit flowers, color them using the
brush tip. They look especially pretty when the petal tips are just a shade darker then the center of the flower. You can also dye Pretties Kit pearls. Color them with the brush tip and dip them into Clear Stampin’ Emboss powder while they’re still wet. Heat emboss to set the color.
BRASS TEMPLATES. Using a brass template as a stencil, trace around images with the fine tip.
STAMPIN’ AROUND® WHEELS. Try creating a multicolored wheeled image. Ink a Stampin’
Around wheel in the main color, and then use a pastel applicator dipped in Stampin’ Mist to
remove ink where you want to use a different color. Use the brush tip to add color to those
spots. Roll wheel onto paper.
LETTERING. Use the fine tip to journal or write notes in hand-made cards. The marker color will coordinate perfectly with your card stock and ink for a very professional look. For another fun look, print journaling using the Write Me a Memory Journaling Font CD, and then outline or
draw a box around important words with the fine tip. This will add a splash of color and
emphasize the parts that are most important to you.


Comments
Linda