Saturday, September 29, 2007

Napkin Ring

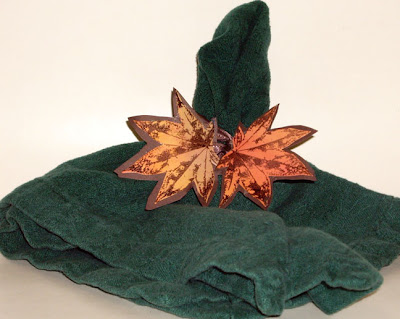
I have been playing with the With gratitude set I really like it. I made a napkin ring after being inspired by one I saw at Michael's today. I started with some glossy card stock and spectrum ink. I first used a brayer to ink up my glossy card stock. You do this by rolling the brayer over the spectrum pad with it separated. Then roll it over the card stock to blend the colors. then stamp with brown stazon ink and let dry. Carefully cut out and at the same time cut a leaf from chocolate chip card stock making sure it is slightly larger. Then using the new chocolate chip satin ribbon in the fall catalog glue both leaf and card stock together sandwiching the ribbon between the card stock . Wrap around a napkin and you have a hand made napkin ring! Thanks For Looking Virginia

Friday, September 28, 2007

New Look

I bet you have been wondering what I have been up to. I have been busy sprucing up my blog. It took me a few days to re-work my header! I promise I will post something tomorrow. TFL virginia

Sunday, September 23, 2007

Christmas card

This card was made much the same way I made the card below only using different inks.

Ghosting
Start with glossy paper and versamark ink. Stamp all over with "lovely as a tree" stamp set". Then I inked up a brayer using the Blue Bayou Ink pad and rolled that all over the glossy card stock. Then quickly rubbed off the excess ink. I then re stamped with night of navy ink uning the pine tree stamp over background images.


Supplies

Ink - Blue Bayou, Night of navy, Versamark


Paper - Glossy Card stock and Whisper White, Night of Navy


Accessories -Satin ribbon Oval punches small and large

Thanks for looking Virginia

Autumn


This card came about today when I was perusing a few blogs. I came across Cambria Turnbow's blog and was intrigued with the paper she made on this card. When reading what she did I realized it was ghosting technique I already knew and use with my Technique classes. Although she used different ink than I used. So I decided to try my hand at it!
Ghosting
Start with glossy paper and versamark ink. Stamp all over with "With Gratitude" stamp set", try and say that 3 times fast!! Then I ink up a brayer using the spectrum pad in Pumpkin Pie and roll that all over the glossy card stock. Then quickly rub off excess ink. I then re stamped with chocolate chip ink over images. Before assembling I stamp the chocolate chip cardstock with fine lace in the same color ink. This give a subtle texture to the background. This card was then assembled with a scrap of le Jardin Designer series paper and chocolate chip satin ribbon. TFL Virginia

Saturday, September 22, 2007

Another wedding!

Wow I have been to 3 weddings in the last month. This is a card I made for my best friends son Eric and his wife Jessica. Since they had a fall wedding I thought it would be nice to have a fall theme. This card stared with a thumping technique. You ink the stamp with Creamy Carmel and then thump using the markers like a drum stick working from the lightest to the darkest colors then huff (blow hot air) on to the stamp then stamp the card. once up and once upside down to create a reflection effect. I then used the aqua painters to paint the sunset and water. Then I cut a scrap piece of baroque designer paper stamped on a scrap of Close to Cocoa the floral design from baroque motif and then cut it out Lastly I assembled every thing and stamped the envelope.

Supplies
Stamps - Lovely as a tree, Baroque Motifs
Ink - Creamy Carmel, Groovy Guava, Chocolate Chip
Paper - Very Vanilla, Baroque, chocolate chip
Accessories - Stampin' write markers in the colors of
Summer Sun, Really Rust, pumpkin Pie, Watercolor markers

Thursday, September 20, 2007

A cute idea by my sister in-law Ana


Another cute idea by my sister in-law Ana. This is a design she made for a birthday party gift and project for her daughter Julia. She had the supplies cut and ready for the girls to make a do not disturb sign for their rooms. Very cute! The girls loved it and from the sounds of it the project was a hit!
Check out Ana's Blog. If you haven't already guessed it my sister in-law is Brazilian so it may be difficult to read but well worth perusing!

Wednesday, September 19, 2007

Scrapbooking Stampten!

On Tuesday our first scrap book ten met! This was our first project, Using Designer series paper I cut strips for the accent paper then I punched circles out of the apple cider paper. Using craft ink I colored the chipboard flower and then using my crop-a-dile punched holes around the flower. Then using sanded background stamp I stamped scraps of river rock and then using stampin'ups new corner punch to create the corners for my pictures. Lastly Using Baroque stamp set I created flourishes and the sentiment through out the page. I have never been confident in my penmanship so I went to my computer and printed out the journaling that goes with this page. My favorite part is how my friends who take this class use what I show them but come up with their own ideas, so many in the group had different layouts it was so neat! I forgot to mention that the idea for this layout came from another demo I know Mary Kay Thanks for looking
Supplies
Stamps Baroque and Sanded
Ink Creamy Carmel, Always Artichoke
Paper Designer series paper Apple Cider, Le Jardin and Always Artichoke
Accessories circle punches, Crop-a-dile

Saturday, September 15, 2007

Shower gift

I am going to a baby shower today and I made this gift set yesterday. I got the idea from Laura Currie my upline who always has such wonderful projects. I am sorry I sponged the edges with Creamy Carmel but I am happy with the over all out come. This project took a lot of masking and several tries before I got it right. But I of course loved the challenge. I am redoing the frame as we speak and if I get a chance I will post a picture of it! I am so neurotic!!


Supplies


Stamps-Zoofari, Doodle alphabet
Ink-What color didn't I use Ha! Night of navy, summer sun, mellow moss, Pixie pink
Paper-Designer series papers, very vanilla, bashful blue


Accessories-Frame, Ribbon


Here is the picture of the new frame.

Sunday, September 09, 2007

Halloween


Happy Halloween ! I can't believe it's September. The summer flew by. Here is the second card for this month's stamp ten. A very quick and easy card. The card is stamped with brown Stazon and then I colored the card with watercolor crayons. I used the masking technique to put the pumpkin in front of the others. It is such a simple technique and works so effectively. If you have never done this technique I will explain it.


Masking is relatively very simple. You stamp your main image on your card and then you take a post it note and stamp that same imagine again close to the sticky edge of the note. You take your scissors and cut the figure out right on the line. If you don't cut it on the line you will experience"shadows", which are also known as a "halo" when you use it. Once it is cut out, put the post-it note mask on top of the figure already stamped on your card. Then you can stamp around and on top of the post it note mask. Lift the mask and you suddenly have a scene that looks like it is all one stamp.


Supplies


Stamps-Autumn Harvest, Sanded, Everyday flexible phrases.


Inks-Brown Stazon, Chocolate Chip


Paper -Pumpkin Pie, Chocolate Chip, Whisper white


Accessories-Stampin Dimensionals

One layer card!

Sometimes we forget use the simplest techniques. In an effort to get back to basics this card is just one layer! Made with a simple masking technique.

Card is made with a rectangle cut out of a piece of card stock that is then placed over card. Then river rock or Certainly celery are applied to center of card using mask to keep the rectangular shape. I then used the same color ink for the background and used So many says hostess set to stamp some words into the background. Then I used Wild wasabi or pumpkin Pie to stamp the various leaves. This card design is not my own but from a a very talented stamper from Splitcoaststampers you can see her work here. Using one hole bow tie off ribbon to card

Supplies

Inks Green card Wild Wasabi, certainly celery Rust card River Rock, Pumpkin Pie, Purely Pomegranate

Stamps Autumn harvest

Paper Whisper white card stock

Accessories Ribbon and mask

Great Ideas from Convention!


While at convention I saw so many wonderful things many of which we will be learning this year in my stampten groups. One Class I took gave me a list of all the wonderful uses for Stampin’ Write markers. I wanted to share this with you as I never knew there were so many different uses. I now want the whole set! If any one wants to form a group we could all get the markers over several months Email me if you are interested vkillmore@tully.k12.ny.us

below is a hand out from one of my clases feel free to print it out and puting it with your stamping stuff.


Many Marvelous Marker Techniques

The Many Marvelous Markers set is a great investment. Along with the 48 dual-tip Stampin’ Write markers, it includes a horizontal storage case to keep both tips inked evenly. The markers are fun and can be used with so many techniques.


COLORING. Use either tip to color a stamped image. Watercolor paper works great for this
technique because it will absorb the color and leave fewer stroke marks. You can also use a
blender pen to soften and blend the color.


OPAQUE COLORING. Use Whisper White Craft ink to stamp a bold image on dark card
stock. After the image is dry, use either tip to color over the white. This is a great way to get
vibrant color on a dark background.


COLOR TINT BLACK-AND-WHITE PHOTOS. Spray a photo with a finish spray and use
either tip to color on photos. Lighter-colored inks look better than darker-colored inks.


WATER COLORING. Use the brush tip to place color on a plastic Stamp & Supply box. Dip into
the palette of color using a watercolor brush, blender pen, or Aqua Painter and color a stamped
image. You can also color with a blender pen by pulling color directly from the brush tip.


SHADING WITH INK REFILLS. Use the Color Coach to choose a Dynamic Duo color
combination. Use an ink refill for the darker color and the marker for the lighter color. Squeeze a couple of drops of ink onto a Stamp & Supply box. Place the brush tip in the ink drops until the
tip is saturated with the darker color. When you color with the side of the marker, you get duo
colors. When you’re done, scribble on scratch paper until the darker color runs out.


OMITTING. Use the brush tip to color directly onto a stamp to selectively color or omit part of
the image. If you don’t have an ink pad in a color you need, you can use a marker instead. Make
sure to breathe heavily on the stamp to moisten the ink before stamping.


EMBOSSING. It’s simple to emboss a multicolor or omitted image. Ink stamp in VersaMark®
ink. While the stamp is still sticky, color directly onto the stamp with the brush tip. Stamp the
image and emboss with Clear Stampin’ Emboss powder.


SHADING AND HIGHLIGHTING. Choose several markers in different shades of the same
color. Starting with the lightest shade, color directly onto a bold image stamp. Using the next
shade, color around the edges of the image leaving the middle inked with only the lightest
shade. Repeat until just the outside edges are inked with the darkest shade. Stamp image for a
dimensional, shaded look.


WATER MISTING. Use the brush tip to color directly onto the stamp. Mist the rubber with
water and stamp your image (an old Stampin’ Mist® bottle is perfect for this). When you stamp your image it will have a soft look, almost as if it’s been rained on.


COLOR SPRITZER TOOL. You can use the markers with the Color Spritzer tool to create
texture on your stamped projects. You can spritz color onto paper, or for a different look, spritz
directly onto rubber before stamping.


THUMPING. Ink a stamp in a light color ink, and then use the brush tip of darker-colored
markers to randomly “thump” marks of color onto the stamp. This creates an interesting texture and design on your image.


GLOSSY PAPER BACKGROUNDS. Using the brush tips of two or three markers, color a
random design on an old page protector or cello bag (swirled designs work well). Spritz the
design with water until the colors run together. Press glossy card stock face down onto the color, and then lift it out and dry.


DYEING RIBBON. Use either tip to color on ribbon. You can create any pattern in any color
you want. Heat-set the color with a heat tool to prevent smearing


DYEING FLOWERS. For a quick, clean way to dye Pretties Kit flowers, color them using the
brush tip. They look especially pretty when the petal tips are just a shade darker then the center of the flower. You can also dye Pretties Kit pearls. Color them with the brush tip and dip them into Clear Stampin’ Emboss powder while they’re still wet. Heat emboss to set the color.


BRASS TEMPLATES. Using a brass template as a stencil, trace around images with the fine tip.


STAMPIN’ AROUND® WHEELS. Try creating a multicolored wheeled image. Ink a Stampin’
Around wheel in the main color, and then use a pastel applicator dipped in Stampin’ Mist to
remove ink where you want to use a different color. Use the brush tip to add color to those
spots. Roll wheel onto paper.


LETTERING. Use the fine tip to journal or write notes in hand-made cards. The marker color will coordinate perfectly with your card stock and ink for a very professional look. For another fun look, print journaling using the Write Me a Memory Journaling Font CD, and then outline or
draw a box around important words with the fine tip. This will add a splash of color and
emphasize the parts that are most important to you.

Wow My sister in Law is a diva!


My sister In law has become quite the Scrapbooker! She has with the help of my brother been posting to the splitcoaststampers gallery some of her work. It is very detailed and I have taken a lesson or two from her. Well she has been the named the scrapbooking Diva of the week at split coast Way to go Ana! Check out her work here!

A frame as a wedding present


As I mentioned earlier I just attended my nephew Josh's Wedding in Florida. It was so much fun and he and his wife Sara looked so happy. I wanted to give in addition to the regular gift something personal so I decided to make his new family a frame. It amazes me how easy this is and I really enjoy the process.


Supplies


Stamps - Garden Silhouettes Hostess set, Itty bitty Backgrounds

Inks -Always artichoke and River rock

Paper Baroque designer series paper, whisper white

Accessories - Prima flowers, frame I purchased at hobby lobby


TFL Virginia

Monday, September 03, 2007

Stamping up promotion!


Wow stampin , Up has a great promo to help kick off my stamping clubs! The Fall Frenzy Promotion runs from September 1 through September 30.
Spend $30 in regular priced merchandise and qualify to purchase one of each of the six promotional stamp sets listed below at 30% off!
#105355 - Bitty Boos Too (page 26)
#109284 - Haunting Halloween (page 29)
#107383 - Thoroughly Thankful (page 30)
#109373 - Autumn Fest (page 108)
#109421 - Elementary Essentials (page 91)
#110366 - Stem Silhouettes (Holiday Mini page 17)

Sunday, September 02, 2007

Second card for My nephew's wedding

I never can decide which card is best so I usually make two This is the one I ended up using.

My nephews wedding was wonderful and a fun time was had by all! This card uses a technique I learned at convention. I took a piece of wired ribbon and pulled the wire from one end. This caused it to gather and created some depth and texture to this card.


Stamps - Brocade Basics, baroque Motifs, Sanded


Paper - River Rock and Always artichoke


Inks - Always Artichoke and Groovy Guava


Accessories - Certainly celery satin Ribbon

Last chance products Plus stamps paper and ink!

Last chance products Pool Party 3/8" (1 Cm) Striped Grosgrain Ribbon [ 156290 ] $6.30 Gold 12" X 12" (...