Posts

Showing posts from November, 2008

Tee Pee Card Video Tutorial

Image
I hope you each had a wonderful Thanksgiving and survived the crazy shopping crowds on Black Friday! I enjoyed shopping from home and playing in my stamping studio. Below is a tee pee card I made for the thanksgiving table. I originally saw this idea at a swap i attended a few weeks ago. Karen was the one who showed us how to make the card here is a link to her original card . I made a similar card last month with my stamp clubs. The card was a bit difficult to explain so with my hubbies help I made you a video! the video has some issues but I think it gets across the process. So here goes. Hope you enjoyed it. Don't forget just a few short hours left on the extravaganza sale! See the post below for details.

SALE ENDS MONDAY!!

Image
The Extravaganza SALE ENDS MONDAY!! Wow sets are flying out of here real fast One set is already sold out! Don't miss out - order soon! The All in the Family Bundle is already sold out! To see the flyer, read below - then place your order HERE! Tomorrow I will post a new card and have a video instruction to go with it. Here's a sneek peek

Happy Thanksgiving

Image
Hope you are having a wonderful thanksgiving. I am thankful for my family and friends. I am lucky enough to have my two wonderful sons visiting. Enjoy! Card for My Mom. I love making a special card for my Mom's birthday. She is always so appreciative of the card and sometimes enjoys it more than the gift! Thanks MOM. Supplies Stamps Pocket silhouette, Elegant greetings Ink Baha Breeze Paper Baha Breeze DSP and Card stock, Whisper White Accessories Curly Label, Scallop,1 3/8 and 1 1/4 Punch, Baha Breeze Striped ribbon, envelope big shot die, Ice square brads Punch Scallop circle from Baha Breeze DSP. Punch 1 3/8 circle from Baha Breeze Card stock. Stamp flowers for center medallion and punch out and assemble Attach a folded piece of ribbon to the back. Cut a 4 x 5 1/4 sheet of Baha Breeze DSP. Cut from Whisper white card stock an envelope, cut an insert and stamp flowers and sentiment. Punch with curly label punch using DSP Paper. Fold in half and attach to note insert brad Asse

Holiday Extravagaaaaanza

Image
Hello Some exciting news! Stampin ' up not wanting to be left out of the wonderful sales available this time of year has come up with their own sale, it’s so big it is called a Holiday Extravagaaaaanza ! There are bundles on sale for up to 50% off Here are the details To read the flyer check out the this file To see pictures of what is in the bundle click here To shop Click here http://www.virginiaswebsite.stampinup.net/ contact me at 315-727-7288 email me at vkillmore@tully.k12.ny.us The sale is from November 26 th till December 1 st or until they run out of the specials! I am placing an order this evening and another one Saturday Night so call me for your chance to save a bundle!

Christmas Ornaments

Image
I love Christmas cards and I keep making new ones. This one is so easy I wanted to share it with you. Supplies Stamps So swirled, Punches Three Ink Riding Hood Red, Baha Breeze Paper Riding Hood Red, Whisper white, Baha Breeze DSP Accessories Sharpie pen, Punches 1", 1 1/4" Sponge dauber, scallop square punch, Riding Hood Red striped ribbon To make this card start by creating a mask with both punches. I started with the lower Baha breeze ornament. Using your dauber and larger mask place on whisper white card stock. Ink dauber with Baha breeze ink and swirl in a circular fashion. this makes the center of the ornament have dimension. Before removing the mask stamp with same color ink and the smallest snow flake from snow swirled set. To make an ornament that is behind use the circle you punched out from the original mask to cover ornament. When finished using a sharpie marker create strings and ties. Adhere to Baha breeze DSP and adhere that to Riding hood red card stock.

Skaters

Image
I have been drooling over the cards from this winter post set. So I finally took the plunge. Supplies Paper Riding Hood red, Chocolate chip, Kraft Ink Chocolate chip Stamps Winter post Accessories White siglo gel pen, coluzzel scallop punch, Glue pen, Dazzling Diamonds Boho Punch, Circle Punch, Chocolate chip gross grain ribbon. Thanks for looking Virginia

My first video!

Image
I am trying to learn how to make videos. I wanted to show you how this flip card works. Click the arrow above to see how the card opens. I love how this card flips back and forth. Supplies Paper Pumpkin Pie 5 x 5, Very Vanilla, Chocolate Chip 1 X 5 strip Ink Brown stazon, Pumpkin Pie Stamps Happy blessings, Pocket silhouettes Accessories Colzzule, Water color crayons, water color brush, scallop border punch Using your Colzzule center the circle template on the 5 x 5 sheet of Pumpkin Pie card stock. Start by marking the mid line 1/2 inch on either side. Count in 3 lines on the template and cut in 1/2 inch from circle. Fold each side the opposite way. With a small piece of Very Vanilla stamp image and sentiment color using water color crayons. Cut with coluzzel on the 4th circle in. Adhere to card. Punch chocolate chip strip using scallop border punch. Adhere to edge of card

November Scrapbook page

Image
Wow this page was a lot of work but it came out much better than I expected. I can't wait to put some of my Thanksgiving pictures in it. Supplies Paper Chocolate Chip, Pumpkin Pie, Always Artichoke, Kraft, Very Vanilla, More mustard designer series paper Ink Chocolate chip Stamps Happy Blessings, Happy Everything Accessories Glue dots, Stampin dimensionals, watercolor crayons Punches; Oval punches all three sizes Cut 5 pieces from each punch in Pumpkin pie card stock Boho Punch Cut three flowers for the top of the pumpkins I started this page with slicing sections of More mustard designer series paper for the hay stack. Using some two way glue pen. I adhered the stack on the left of my 12x12 sheet of Kraft card stock. I then wrapped a piece to look like a tie towards the top of the hay stack and then folded some of the strands downward to create a cornstalk effect. Next cut little snips to create grass from some strips of always artichoke card stock adhere at the bottom of the pag

November Class projects

Image
This project is for my friend Barb who asked for directions to this card. Barb is demo friend of mine Who is such a great friend and always helps me with my workshops in Cortland. last night she sat and punched 15 ovals for every customer at our monthly workshop. So this one is for you Barb! Santa So easy to make, I saw this card at a swap in York PA , it has kind of grown on me! I made some adjustments but he is so cute and ther is very little stamping. Supplies paper Whisper white, Real Red, basic black, Blush Blossom Ink Real red, Pink Pirouette Stamps Punch pals Accessories White uni Ball signo pen, Crimper, Dauber, Punches; 1 1/4 " circle 2 (cut in half for moustache and eyebrows) 1 " circle 2 (eyes) 1 in Real red for mouth 1/2" circle 2 (pupils) Tab Punch cut in half for nose Scallop Pinch 4 Start by Punching the beard Scallops you only need four. As when you glue down the scallops you will trim to card edge use left overs to create sides of beard. Layout all y

Thanksgiving

Image
This card is thew second one I made for last month workshops. I love the little bird ! Supplies Paper Sage Shadow, More Mustard, Really Rust, Whisper white Ink Chocolate Chip, More Mustard, Really Rust, Riding hood Red Stamps A season of friendship Accessories Stamping Dimensionals

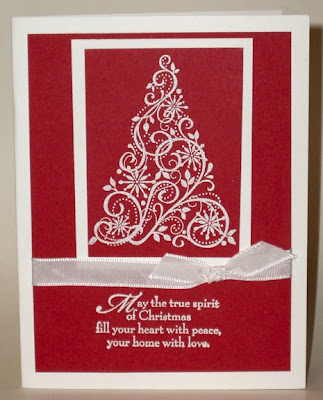
It's getting to look a lot like Christmas

Image
This is the easiest card to make. It is stamped with versa mark and then embossed in white embossing powder. Supplies Ink versamak Paper Whisper White, Riding hood Red Accessories White satin Ribbon, White embossing Powder Thanks for looking!

Another cute halloween card

Image
I know it is too late but I just loved this card! I saw several versions of this card and here is my version! This card is done with mostly punches and a little stamping Supplies Stamps Sanded, Everyday Flexible Phrases Paper Tangerine Tango, Kiwi Kiss, Basic Black, Whisper White, Elegant Eggplant Ink Chocolate chip, Riding hood Red, Kiwi Kiss Accessories Top Note die, arrow, 1 1/2, 1/2 circle punches, tab punch, Stampin Dimensionals, siglo white gel pen, dauber, Black journaler Start by running a 4 1/4 X 5 1/2 inch sheet of kiwi kiss and a scrap of elegant eggplant card stock through your big shot using the top note die. Because this is a bigz die you can run both papers at the same time. Arrange the Elegant Eggplant card stock towards the top so it can be the hair. Take the scrap and cut thin triangles for the hair. Punch two white circles with the 1 1/2 circle punch. With the same punch cut one circle from scrap of kiwi kiss. Cut these in half for the eyelids using the dauber cre

Happy Belated Halloween

Image
Don't you just Love my Spiddy!! I made this little project after I saw a few versions on the web. I added my own ideas and wanted to share with you how to make him he is a snap to put together with the stampin'up punches! Suppl es Punches Scallop Cut 2 in black Corner punch Cut 2 in Black and 2 Tangerine Tango 1/2 inch circle punch 2 in kiwi kiss 1/4 inch circle punch 2 in black string to hang object Punch it all out and put it together. Mouth is done with a 3/4 and 1/2 inch punch. first punch the smaller circle out of Kiwi kiss and then punch the larger circle off center to create the mouth. Thanks for looking I have several other projects this weekend to show you so stay tuned! Virginia